November 22, 2010

Matcha Green Tea Sablés and Japanese Bakeries

I've been baking a lot this past week, and mainly green things for some bizarre reason, matcha (green tea) chiffon roll, matcha sables and also pandan cake. Matcha, a type of Japanese green tea, is a wonderful flavour that pairs really well with red bean and or black sesame, as many Japanese sweets and desserts attest to. The rich fragrant aroma and the bittersweet aftertaste of matcha lends itself well to most sweet endings - cakes, cookies, ice-cream, macarons, crème brûlée and the list goes on.

greenteasables-02greenteasables-05

One of my go-to books for desserts is this Japanese pastry & dessert cookbook Okashi by Keiko Ishida. There are many basic recipes covered in the book such as different types of sponges, pastry creams and custards in addition to Japanese-style french pastries. What I love about the Japanese renditions are the delicateness and subtlety that Japanese bakers bring to the richer and heavier french cousins. And of course the infusion of traditional Japanese flavours like sesame, soy, red bean and of course the ubiquitous matcha green tea. The cakes are always oh-so-light, melt-in-your-mouth texture and you can always tell it's made with such care and precision.

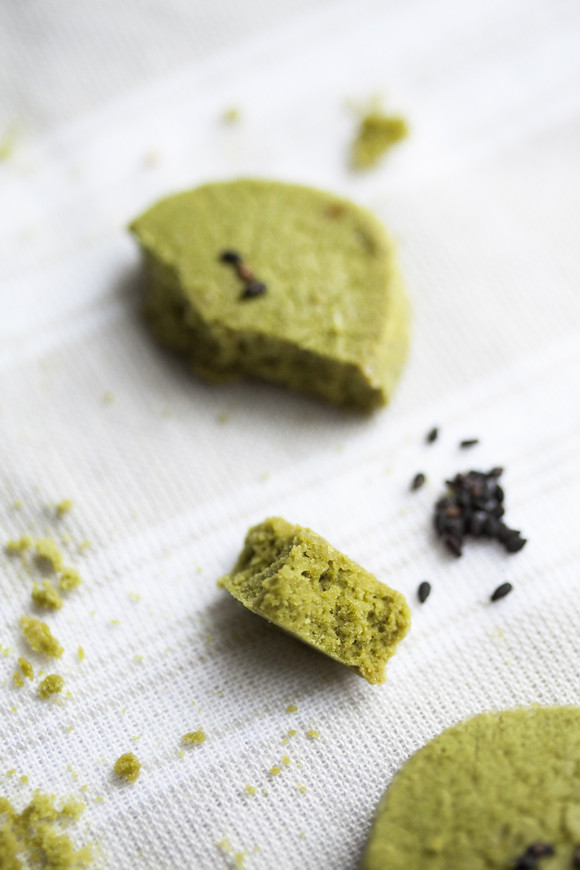
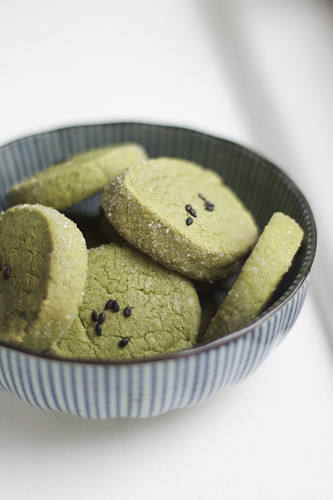
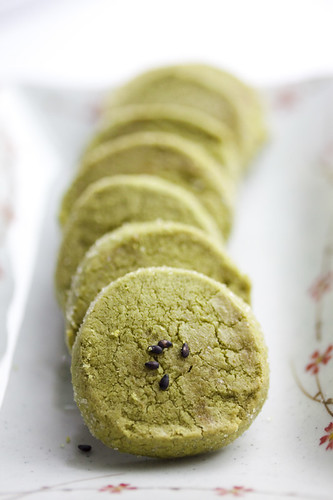
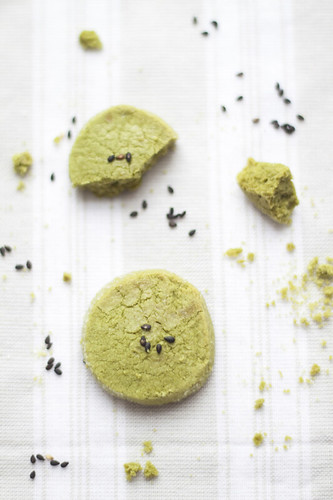
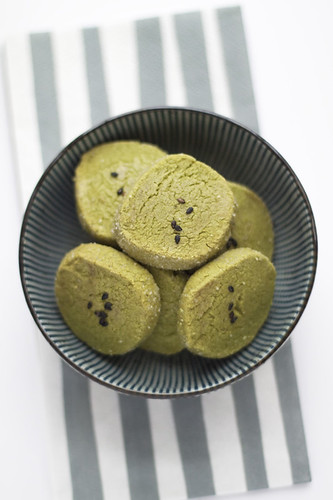
To satisfy my Japanese pastry craving, I made the matcha chiffon roll with red bean paste from the Okashi book but it didn't last long enough (all eaten up!) for me to photograph haha. I usually bake at night, which means I don't have good natural lighting for shooting (using artificial lighting and shooting at night is something I definitely need to learn more about!). Being too lazy to recreate it again, I decided to try something new out of the book, and decided to pick the matcha green tea sablés cookies since they looked pretty easy. They turned out pretty well and were quite addictive, I kept reaching for more and more! The recipe is posted below after the post, with some of my comments in italics.


greenteasables-08greenteasables-10


I would also like to share with you some of my favourite Japanese bakeries. k-ki at Ann Siang Hill is one of my favourites, helmed by Japan-trained Singaporean pastry chef Kenneth Seah and his wife Delphine. They don't make large quantities of their cakes and the popular ones are often sold out before the end of the day. The Mont Blanc and Strawberry Tart are to die for! Another great bakery is Pâtisserie Glacé, which has amazing cheese tarts and strawberry shortcakes. It started out of a small shop in a quiet spot, but has since located to a bustling location in Icon at Tanjong Pagar. Both these bakeries are in Singapore and located within walking distance of my house, lucky me!

To get my fix here in London, William Curley (again walking distance to me, yay!) does a good Mont Blanc, and selection of green tea flavoured desserts as well, since his wife Suzue Curley is a Japanese pastry chef. I recently discovered Lanka at Primrose Hill,where I met up with Pleasure Monger and Going With My Gut. It serves up pretty decent Japanese cakes and French food as well. Sadly, I've never visited Japan, where I'm sure my heart (and stomach) will not be able to withstand the temptation and lure of the great Japanese pastries and food. That is definitely one trip I'll need to make in the near future. But till then, I'll just have to contend with indulging myself with the yummies from the above bakeries and making my own!

greenteasables-06greenteasables-04

Green Tea Sablés
(from Okashi by Keiko Ishida)

240g pastry flour (I substituted this with 200g plain flour and 40g corn flour)
15g green tea powder
150g unsalted butter, room temperature
130g icing sugar
pinch of salt
2 egg yolks
1 egg white
40g granulated sugar
green tea leaves (or black sesame seeds), optional

Sift flour and green tea powder twice. Set aside.
(I measured out the flours and green tea powder in a big bowl and then sifted it onto parchment paper, and then re-sifted back into the bowl)

Beat butter, icing sugar and salt until soft and creamy. Add egg yolks and mix well. Add flour and green tea powder mixture and fold in with a spatula. Cover dough with plastic wrap and chill in refrigerator for about 15 minutes.
(I used the paddle attachment on my stand mixer to do the above mixing. The refrigeration is to harden the dough, as the butter might have become soft after all the handling/beating)

Take out dough from fridge and divide in half. Shape into logs about 3.5cm in diameter. Wrap the logs in parchment and refrigerate until firm. If not using immediately, wrap with cling film and freeze. Cookie dough can be kept for up to 2 months in the freezer.

Preheat oven to 150 deg Celsius. When dough is firm, cut logs into 7mm thick rounds. Dip edges in granulated sugar.
(I found it easier to coat the logs with sugar first, then to cut them. I also made several logs instead of 2 long logs as my dough kept breaking apart)

Place cookies on baking sheet lined with parchment paper. Brush a little egg white over the cookies and scatter a few green tea leaves on top if desired.
(I used black sesame seeds instead as I didn't have green tea leaves)

Bake for about 25 minutes, then remove and leave to cool on wire rack before serving. Store cookies in airtight container at room temperature for up to 10 days.

greenteasables-07

November 7, 2010

Five Faves - Great Blogs You Should Check Out!

I've spent the past 2 nights trawling through lots of blogs and getting incredibly inspired by all the talent that's out there. Given my varied interests, my google reader list is getting longer and longer by the day and I want to read them all! I've been surfing tons of food (but of course!), interior & styling, wedding and event design and also photography blogs and I just can't get enough of them. Some of my favourites and new discoveries are shared below and I hope you get equally inspired, as I have.

1. Pinecone Camp

Images from Pinecone Camp

Janis is an interiors and lifestyle photographer that is multi-talented from Vancouver. She bakes, crafts, styles and takes incredibly gorgeous pictures! Check out her portfolio where she's done shoots for numerous publications. She's also got a lovely etsy store where you can buy her photo prints. I simply love her aesthetic and style :)

2. The Loveliest Day


I came across Melissa of The Loveliest Day through Ruffled, which is a wedding portal that features real weddings, diy ideas and other inspirational concepts for weddings. I saw her French vintage inspired patisserie bridal shower shoot on it and immediately fell in love with her style. Based in Southern California, she's just started her event design and styling business, turning something which is her love and passion into a full-time career (something I'm super envious of!). Definitely someone to watch out for in the wedding design business!

3. Pleasure Monger


What can I say about this lovely lady that hasn't already been said :) Rachel posts tantalising pictures and stories about her culinary and gastronomic adventures and is a joy to read. Her writing takes you into her world and makes you feel like she's an old friend chatting and tell you about what's new in her life. An aspiring baker, she churns out lots of goodies and is truly a domestic goddess!

4. The Found Blog


Jeni Maus runs a vintage-inspired prop rental and styling business Found Vintage Rentals (check out the full collection!!) in California and her ever-growing collection of vintage furniture, accents, crockery and trinkets would drive anyone with props-addiction (like me) insane with jealousy! Her eye for good finds and aesthetic is amazing, and I would love to visit her showroom one day (if only it wasn't halfway round the world!). Her pieces have been featured in many weddings and shoots and is an incredible source of inspiration!

5. What Katie Ate


Katie Quinn Davies is a Sydney-based food photographer and food stylist with a gorgeous portfolio. Her work is stunning and has a simple yet understated elegance in the way she styles and shoots. Definitely aspirational and inspirational for me, I just melt when I see her photos. Other than the beautiful photos, she also posts recipes and reviews on restaurants in the Aussie/Sydney food scene. What more can a foodie ask for?

There's really so much more out there that I haven't been able to feature here, and hopefully I will be able to introduce interesting finds and perennial favourites to you, though I suspect my list will grow faster than I can blog about them :)

November 3, 2010

Refreshing Pear Sorbet, with Mint & Lime

I've been trying to do so many different things lately. Having recently finished (most of) the Blogging Your Way class, I've been thinking a lot about how to improve this blog, what I want to achieve with it and most of all, what is it that I'm passionate about and want to pursue. As you may have noticed, I've changed the layout of the blog and made some slight tweaks, begun to consciously style my photos a bit more and put effort into taking good pictures. I've got a lot more room for improvement obviously, but I'm really grateful for and blessed by all the encouragement that I've gotten from friends and visitors to this blog. It makes me want to do more, and create even more beautiful things and images. I'd especially like to thank Arianna of Arianna Interiors, who featured my blog yesterday here. I'm sooo excited cos it's the first time I've ever been featured on someone else's blog! :) I met the lovely Arianna together with a group of other design bloggers, who are forming dbcollective (Design Bloggers Collective) as a way to further promote design blogs and the design community.

Another thing keeping me busy is Pinterest, a new visual bookmarking/cataloguing site. Check it out if you haven't already, it's addictive! I've been surfing relentlessly and 'pinning' things rabidly. My pins and boards can be found here or follow the link on the right column. There's so much more I want to do, like take time to properly look through all my fellow BYW classmates' blogs and do more 'discovery' research, read up on photography techniques, just read (the new Jasper Fforde!), pick up my flower arrangements again, and of course bake and cook!

pearsorbet-11

Speaking of which, I haven't made ice-cream in a while. In fact, it's been really long since my freezer bowl cracked and leaked weird blue fluid (which was quite a while back). The replacement bowl has been sitting around for a while now and I thought it was about time for a christening. I eyed some pears and thought to myself that they'd make a great refreshing sorbet. I'll just pretend it's still summer.

pearsorbet-12

To kick it up a notch (a la Emeril), I wanted to add more flavours to the pears. Initially, I wanted to pair the pear (no pun intended) with ginger in order to spice it up but I didn't have any ginger in the house. What I did have was my newly acquired mint plant (now dead sadly) and some lime, which I thought would really enhance the delicate flavour of the pear. I'm a big fan of lime, vs lemon, as I feel like there's that extra fragrance to it. True enough, the sorbet was heavenly, light yet with a creamy texture from the pear flesh, gently spiced with cinnamon and nutmeg and laced with the refreshing notes of mint and a hint of lime. I also put together a simple verrine dessert, as per the serving suggestion below. Enjoy!


pearsorbet-13

Pear Sorbet, with Mint & Lime
(makes about 500ml, my ice-cream maker is a 0.6L)

4 pears, peeled and cubed
70g caster sugar
70g glucose (replace with sugar if unavailable)
50ml water
half a lime (you will need both the juice and the zest)
3-4 sprigs of mint
half tsp nutmeg
half tsp cinnamon
(the spices are really to taste, so it's up to you how much or little you want to put)

Heat the sugar, glucose and water in a saucepan and bring to a simmer.

When the sugar has melted, and the syrup is simmering, add the diced pears and spices into the sugar syrup. Squeeze the lime into the mixture (retain the lime, as you'd need the zest later). Turn the heat down to low.

Take the saucepan off the heat once pears have softened. This should take about 10 minutes.

Add the mint leaves to the mixture and grate the zest of the lime into it. Let this steep to impart their flavours while the mixture is cooling. You don't want to add the mint and zest during the cooking process (or while the mixture is very hot) as the flavours will be over-extracted and become bitter. Let the mixture cool for about an hour.

Remove the mint and puree the mixture. I used a hand blender, but I suppose you can use a food processor or stand blender as well, as long as the mixture is turned into a smooth puree. Transfer into a container and refrigerate, preferably overnight.

Turn on your ice-cream maker as per your manufacturer's instructions (if using a freezer bowl or disc type, this should be placed in the freezer at least overnight, I usually just keep mine in the freezer whenever I'm not using it).

Pour chilled mixture into freezer bowl and churn. If your bowl is chilled enough, this should not take more than 15 minutes to churn into a frozen mixture. The longer you allow the machine to churn, the more likelihood of bigger ice crystals which will result in an unsmooth ice-cream. So you'd ideally want a cold machine that will do the job fast.

Spoon sorbet into a container and store in freezer or serve immediately.

Serving suggestion:
Speculoos biscuits, crushed
Pears, cut into small cubes (I soak these in a lemon-water mixture to prevent oxidation)
Pear sorbet

Spoon 2 tsps of crushed speculoos into a transparent serving glass.

Add 2 tsps of chopped pears.

Top with a scoop of pear sorbet.

Garnish with a sprig of mint and some wafers.

pearsorbet-14
Related Posts Plugin for WordPress, Blogger...